Showing posts with label distress inks. Show all posts

Thursday, 13 October 2016

Diwali Card 3

Hello everyone,

Today I have come up with the third card that I have made for Diwali this year. I am finding to make the diwali cards to be more fun than any other occasion!


I have used a stencil from The craftersworkshop and applied texture paste (homemade) , a normal white one. Then i ran over my versamark ink pad over the raised surface lightly and sprinkled gold embossing powders on it. After taking this through Heat embossing, this came out with a gold embossed raised surface but more shimmery than a gold texture paste!

I added some water color to cut down the monotonous look, as its Diwali! Blended some inks through the stencils. I cut down a diya and colored it. The sentiment is from Peek-A Boo diwali stamp set! The stamp set has loads of diwali greetings both in English and Hindi. Indian friends can look over to it for the Hindi Greetings. 

I am sharing this project with:


Monday, 11 July 2016

A birthday shaker card

Hello all,

I have newly learnt making shaker cards and I must confess I have become too much addicted to these. With my first post for this month, I decided to go for the second post making a shaker card with the Magical fairies of the Peek-A-Boo designs

Without much delay, moving on to the steps:


I first inked and blended two colors of blue from distress inks. After blending it, added some big drops of water from a water brush. After it got completely dried, I added some white dots and sprayed too with white acrylic. The base is done.

Meanwhile, I stamped and embossed the fairies with black, fussy cut them and adhered them to a case panel (which is cut manually).

I also gave a nice blue hue to the panel and embossed the sentiment on the OHP sheet.
Finished it with some sequins :)


Take  a closer look


I would like to share this card with:


http://craftymilka.blogspot.in/2016/07/two-cancer-cards-ilovemathchallenge2.html
My take on for this challenge:
Two fairies
Two colors of distress inks
Two sentiments
sentiments placed in Two different techniques (stamped & embossed)
Two layers 

Friday, 1 July 2016

July Release and Challenge inspiration For Peek-A-boo Designs

Hello All

With the fresh start of the month, I am here happy to announce that I have been chosen as one of the Design Team members of the Peek-A-boo designs India from July’16 to Dec’16. I am all set to have fun crafting time with the other awesome DT members.

On the first day of the new release of the July products, we bring to you a new challenge for this month too. Hop on to their blog for more details.

The theme of the challenge is LAYERS.
You can layer your creation with anything may it be stamping or dies or may be a combination of both.

So, here I am with my two projects for July challenge inspiration.


FIRST PROJECT


My first project is with the stamp set that I have designed for the Peek-A-Boo : Humming blossoms. And I couldn’t resist myself from trying this first. The steps that I have followed for making this card go on like this…

1.       Embossed the flourish from the stamp set with white embossing powder and masked it and again stamp it to the down to make it a good bunch of flowers.
2.       Colored it with distress inks and the background too.
3.       Splattered some distress ink (artistry ink – Ocean reef) on the background.
4.       Meanwhile stamped and colored the humming bird and fussy cut the same. Stuck the bird with the double tape on the background.
5.       Stamped the sentiment from the same set with Black Archival ink.
6.       Finished it with some pink sequins.


Take a closer look


SECOND PROJECT

For my second project too, I have selected a stamp set that I have designed- Bold Butterflies. It is best suited for the mixed media crafters but the CAS crafters also cant ignore this.


1.       Embossed the background white with Swirly Time.
2.       Colored the background with different distress inks by blending it together.
3.       Cut it manually for the shape in between.
4.       Embossed the bold butterflies with Princess Gold and Enchanted gold on a vellum and fussy cut it.
5.       Finally the border inside with the stamp “Its Plaid time”.


Take a look…


Stamps used:


I hope you like it and I am pretty sure you all will love this month’s release.

Thanks for stopping by and happy crafting people :)

Hugs

Ria

Saturday, 11 June 2016

Father's day Card with Altenew + MFT

Hello all,

It has been a long time I have posted any project. My schedules didnt let me to. I really missed all your fabulous works :)

Just a couple of days befor I recieved my first stamp from Altenew and MFT. I choose to start with Altenew Mini Atlas stamp and MFT -For the bous!

I decided t fuse them together and make a card.


I started with the atlas, embossed in black and the sentiments from the MFT for the boys added wih my hand lettering. I sprinkled some blue distress color, added rhinestones and enamel dots. Finished the card with glitter foam and a blue cardstock.

Here is another look


I hope you liked it.

I would like to share this with:

1.http://paruscardmakingchallenges.blogspot.in/2016/06/june-challenge.html
2.http://www.simonsaysstampblog.com/wednesdaychallenge/simon-says-fathers-dayfor-a-guy/
3.http://fabnfunkychallenges.blogspot.in/2016/06/challenge-308-favourite-colour-combo.html
Favourite color combo is blue and white
4. http://wordartwednesday.blogspot.in/2016/06/challenge-weeks-234-235-anything-goes.html
5.http://onecrazystampercom.blogspot.in/2016/06/june-challenge-anything-goes.html
6.http://sweetstampsblog.blogspot.in/search/label/challenges
7. http://stamplorations.blogspot.in/search/label/CAS%20challenge

8. http://stamplorations.blogspot.in/search/label/CASEplorations


Wednesday, 25 May 2016

Guest Designer Post with Monstrous Set for Peek-A-Boo-Designs

Hello Crafty Friends,

I am guest designing for peek-a-boodesigns.blogspot.com this month with the Montrous set.


With the Flower in a Jar set, I also received Montrous set from Vidushi. The set stole everyone’s heart right from the first day of its release with its super cute creatures. I must admit to the fact that this set and the projects not only made the kids happier but also us! What say?


After playing with this stamp set for a longer time, I finally got some idea to work on these cutie monsters. I have made four projects in total and here it goes:


FIRST PROJECT:

The first thought that I got seeing the set is the starry night. So, I tried to depict one. I took one water color paper and colored it blue of different shades with transparent water color folios. I can also be tried with the distress inks. Then I sprayed some drops of texture white mixed with water and also stamped and smudged some stars to give it a look of shooting star. I stamped the rocket and a monster from the set separately, colored them, fussy cut them and pasted them on the card stock with a 3D tape.  I made the moon with some silver glitter, Finished the bottom side with tapes, glitter sheet and the sentiment embossed with white.
Here is the final look…


SECOND PROJECT:


The second project is also one card with these monsters. I stamped and embossed some stars on a black cardstock and added pearl finished papers for the grounds at the bottom. I stamped the monsters and the rocket separately, colored and fussy cut them. I added them to the card stock with a 3D tape. I added the sentiment at the bottom and embossed it with black. Lastly some foam glitters on the borders.


THIRD PROJECT:

My third project is a CAS card.  I stamped this funny monsters separately and only the face of the monster separately and have drawn a heart around it (I loved the expression of joy on its face), colored them, fussy cut and pasted on a water color paper. Meanwhile I first embossed the mini hearts and stars to it and added colors to it on a random basis and let it spread on its own. Isn’t it looking beautiful the effect!

And the sentiment, I placed it in a single line and the sentiment goes perfectly with the expression ^_^


FOURTH PROJECT:

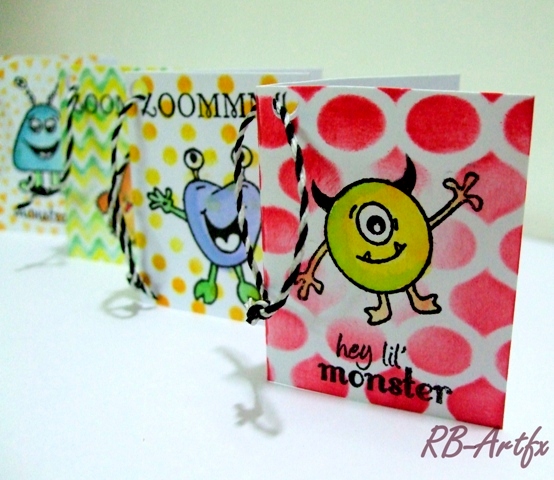
My last project is the cute and small tags. I thought these tiny, cute monsters go best with these. I took some scrap papers and blended some ink on it through a stencil. Stamped each monster on each tag and colored it. I really loved the fact that these monsters actually give you the liberty to color with no limitation. Isn’t it?

Finished with the different sentiments on each tag and some bakery twines! And here it goes:


I would like to share my Third Project with:

http://cuttlebugmania.blogspot.in/2016/05/embossing.htmlhttp://cardsundmore-challengeblog.blogspot.in/2016/05/challenge-159-lets-use-lots-of-colour.html


I hope you liked all the projects with these super cute monsters.

Happy crafting with this set J and lets say ZOOMMM! 

Love and Hugs


Ria