Showing posts with label fuzzy cutting. Show all posts

Friday, 1 July 2016

July Release and Challenge inspiration For Peek-A-boo Designs

Hello All

With the fresh start of the month, I am here happy to announce that I have been chosen as one of the Design Team members of the Peek-A-boo designs India from July’16 to Dec’16. I am all set to have fun crafting time with the other awesome DT members.

On the first day of the new release of the July products, we bring to you a new challenge for this month too. Hop on to their blog for more details.

The theme of the challenge is LAYERS.
You can layer your creation with anything may it be stamping or dies or may be a combination of both.

So, here I am with my two projects for July challenge inspiration.


FIRST PROJECT


My first project is with the stamp set that I have designed for the Peek-A-Boo : Humming blossoms. And I couldn’t resist myself from trying this first. The steps that I have followed for making this card go on like this…

1.       Embossed the flourish from the stamp set with white embossing powder and masked it and again stamp it to the down to make it a good bunch of flowers.
2.       Colored it with distress inks and the background too.
3.       Splattered some distress ink (artistry ink – Ocean reef) on the background.
4.       Meanwhile stamped and colored the humming bird and fussy cut the same. Stuck the bird with the double tape on the background.
5.       Stamped the sentiment from the same set with Black Archival ink.
6.       Finished it with some pink sequins.


Take a closer look


SECOND PROJECT

For my second project too, I have selected a stamp set that I have designed- Bold Butterflies. It is best suited for the mixed media crafters but the CAS crafters also cant ignore this.


1.       Embossed the background white with Swirly Time.
2.       Colored the background with different distress inks by blending it together.
3.       Cut it manually for the shape in between.
4.       Embossed the bold butterflies with Princess Gold and Enchanted gold on a vellum and fussy cut it.
5.       Finally the border inside with the stamp “Its Plaid time”.


Take a look…


Stamps used:


I hope you like it and I am pretty sure you all will love this month’s release.

Thanks for stopping by and happy crafting people :)

Hugs

Ria

Wednesday, 18 May 2016

Guest Designer at Peek-A-Boo designs India

Hello Crafty People,

Today, I have got the opportunity to design for Peek-a-Boo designs for this month.

Today I am going to show some of the projects that I did with the set that I received as my happy mail from Peek A Boo. The set- Flower in a Jar, is one such stamp set I have come across that has endless possibility to work with. Looking at the set only, gives you so many ideas. With this one set, you can assemble all the elements and even the smallest cute bee in one card but also you can use each and every element separately; I have tried to do the latter.

FIRST PROJECT:


For the first card that I have incorporated some painting skills of mine *grin* as the set gave me a beautiful picture to frame. I started with the Jar (the most beautiful element of the set). I stamped the Jar on a Water color Paper with two colors of distress inks viz. Gathered twigs from Tim Holtz distress inks and Green Garland from Artistry inks. First I stamped the Green on the stems and then the Brown on the rims of the jar to avoid merging these.


I loved the crisp image of the Jar and the stems. Then I took some water and a brush to wash the edges (but not too much) also by adding Broken china distress ink (to give a glass effect). I shaded the portion below the Jar with the same inks but this time the brown color on a greater proportion to get the dark shade.
Then I stamped all the flowers with Festive Berries Distress inks (to get the blotted effect) and shaded twice with the same ink to get some layers and finished it off with Gathered Twigs color for the last dark layer. For the leaves Green Garland again with the same technique as I did with flowers. Fussy cut all the flowers and the leaves and arranged it on the Jar simply by sticking it with glue.
I made some extensions to the bunch with the same used colors before to complete the picture. Lastly, the sentiment with some Archival Ink Black. And it’s done!!!!
With only Five colors the whole picture is complete :)


SECOND PROJECT:

For the second project I chose for a Tag. I took a cardstock, stamped the sentiment with Versamark and embossed it Black. I used a stencil and blended some Green Garland on it and again I stamped the Messy lines by Peek-a-Boo designs on it with the same color. I stamped the bunch of flowers separately and embossed it white. 


After that, I colored it with Peacock Feathers and Shaded Liliac distress inks and finished it with some sketching with dark blue, fussy cut them, and pasted it on the tags. And here it goes…


THIRD PROJECT:


My third project is again a card and again florals, as there are so many varieties of flowers to stamp, can’t get enough of one! I randomly stamped the roses with the leaves on a card stock. I colored it with Festive berries and Picked Raspberries, leaves with Mustard seed and Green Garland distress inks, and finished it off with some sketch pens (as they add the darkest shade I need all the times). The sentiment is embossed with white and here it looks like this…


FOURTH PROJECT:


My last project is with the tiniest stamp of the set, yes the BEE. The bee is too cute to ignore and I decided to make a whole card with the bee. I stamped, fussy cut, colored and pasted on a brown card stock. Made the edges on green with one of the designs from Its Plaid time by Peek-a-Boo. Some Mulberry flowers and a ribbon complete the Card.


 Stamps used:


I hope you liked all my projects. Pardon me for making the post long :P

Happy Crafting and enjoy all the Peek-a-Boo stamps!


Hugs

Saturday, 7 May 2016

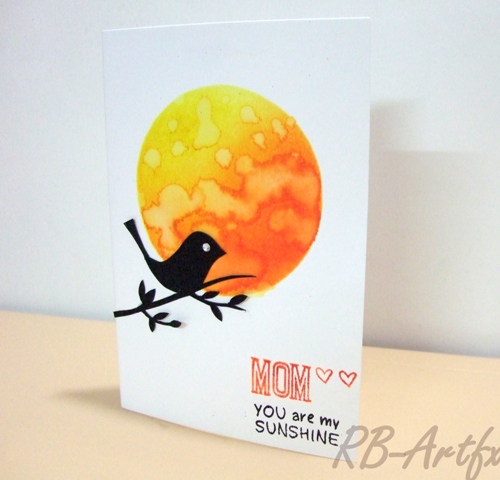
MOM - You are my sunshine :)

Hi all,

I am back with a new CAS card for the mother's day.

Directly to the making process...I have applied the masking process and cut a circle and used as a stencil. Colored it with Tim Holtz distress inks Mustard seed and Spiced Marmalade , blended it together and how I can stay away from the water effect!!!

It works like wonder. <3


I kept the 'Sun' simple and didnt want to ruin it with any other additions or embellishments. I cut out a bird with leaves and a twig to make a contrast.

For the sentiment, I have combined two stamps: for the "MOM", I have used Peek-a-Boo designs India, and "you are my sunshine" from Jane's Doodle Rain or shine stamp set.

Take a final look :)


I would like to share this card with:
1.Craftymilka
2. Peek-a-boodesigns
Inspired from Vijaylaxmi siyal ( Distress inking, water bleaching technique, fuzzy cutting, stamping)

3. Wordartwednesday
4.Craftingbydesigns

Thanks for stopping by and your lovely comments :)

Love
Ria