Monday, 27 June 2016

Getting featured by The Hacker street

Hello and Good Morning Beautiful people,

I am blessed with all the love that you have showered on me in my five months of regular crafting and yes blogging. 

But what could be the better way to get boosted up for the day when you get featured by the talented bloggers in the country :) 

This time its The Hacker Street. 

Here is the link of their blog >>>>


And here is their Facebook page which you can follow and get really good updates on startups and Entrepreneurship :)


You can read the article that they have written about my craft world here 


I hope you will love it :)

Thanks for stopping by and do not forget to shower some love in their blog :)

Hugs

Ria 

Sunday, 26 June 2016

Father's Day Card (Shaker Card)

Hi all,

It has been a really long time I have posted anything and I have missed all your fabulous creations :( and I will surely catch up all the missed posts.

I have done a card, indeed a shaker one for the first time and that too with out a Bigshot.
At first I was reluctant to post this and this seemed too amateur to me :P but later I gave a second thought to post this.

I had made some plaids on paper from Peek-A-Boo Its plaid time. And I cant wait to share this with you.

For my Father's Day card i have chosen the blue one. I first stamped the Quilted Love design from the house of Peek-A-Boo and embossed it silver. Then as i have mentioned earlier that I dont own a bigshot as i am new to craft world so i decided to cut the design with a normal paper knife. After cutting it, I inked it with distress inks (Peacock feather and Broken China), and have made some glitter crumbs by using some glue and rubbing it :D


Here is my first trial with shaker card :) I hope you like it :)


Thanks for stopping by :)

Hugs
Ria


Saturday, 11 June 2016

Father's day Card with Altenew + MFT

Hello all,

It has been a long time I have posted any project. My schedules didnt let me to. I really missed all your fabulous works :)

Just a couple of days befor I recieved my first stamp from Altenew and MFT. I choose to start with Altenew Mini Atlas stamp and MFT -For the bous!

I decided t fuse them together and make a card.


I started with the atlas, embossed in black and the sentiments from the MFT for the boys added wih my hand lettering. I sprinkled some blue distress color, added rhinestones and enamel dots. Finished the card with glitter foam and a blue cardstock.

Here is another look


I hope you liked it.

I would like to share this with:

1.http://paruscardmakingchallenges.blogspot.in/2016/06/june-challenge.html
2.http://www.simonsaysstampblog.com/wednesdaychallenge/simon-says-fathers-dayfor-a-guy/
3.http://fabnfunkychallenges.blogspot.in/2016/06/challenge-308-favourite-colour-combo.html
Favourite color combo is blue and white
4. http://wordartwednesday.blogspot.in/2016/06/challenge-weeks-234-235-anything-goes.html
5.http://onecrazystampercom.blogspot.in/2016/06/june-challenge-anything-goes.html
6.http://sweetstampsblog.blogspot.in/search/label/challenges
7. http://stamplorations.blogspot.in/search/label/CAS%20challenge

8. http://stamplorations.blogspot.in/search/label/CASEplorations


Wednesday, 25 May 2016

Guest Designer Post with Monstrous Set for Peek-A-Boo-Designs

Hello Crafty Friends,

I am guest designing for peek-a-boodesigns.blogspot.com this month with the Montrous set.


With the Flower in a Jar set, I also received Montrous set from Vidushi. The set stole everyone’s heart right from the first day of its release with its super cute creatures. I must admit to the fact that this set and the projects not only made the kids happier but also us! What say?


After playing with this stamp set for a longer time, I finally got some idea to work on these cutie monsters. I have made four projects in total and here it goes:


FIRST PROJECT:

The first thought that I got seeing the set is the starry night. So, I tried to depict one. I took one water color paper and colored it blue of different shades with transparent water color folios. I can also be tried with the distress inks. Then I sprayed some drops of texture white mixed with water and also stamped and smudged some stars to give it a look of shooting star. I stamped the rocket and a monster from the set separately, colored them, fussy cut them and pasted them on the card stock with a 3D tape.  I made the moon with some silver glitter, Finished the bottom side with tapes, glitter sheet and the sentiment embossed with white.
Here is the final look…


SECOND PROJECT:


The second project is also one card with these monsters. I stamped and embossed some stars on a black cardstock and added pearl finished papers for the grounds at the bottom. I stamped the monsters and the rocket separately, colored and fussy cut them. I added them to the card stock with a 3D tape. I added the sentiment at the bottom and embossed it with black. Lastly some foam glitters on the borders.


THIRD PROJECT:

My third project is a CAS card.  I stamped this funny monsters separately and only the face of the monster separately and have drawn a heart around it (I loved the expression of joy on its face), colored them, fussy cut and pasted on a water color paper. Meanwhile I first embossed the mini hearts and stars to it and added colors to it on a random basis and let it spread on its own. Isn’t it looking beautiful the effect!

And the sentiment, I placed it in a single line and the sentiment goes perfectly with the expression ^_^


FOURTH PROJECT:

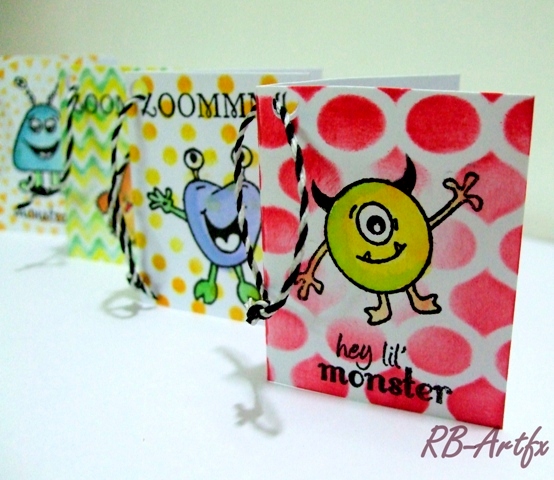
My last project is the cute and small tags. I thought these tiny, cute monsters go best with these. I took some scrap papers and blended some ink on it through a stencil. Stamped each monster on each tag and colored it. I really loved the fact that these monsters actually give you the liberty to color with no limitation. Isn’t it?

Finished with the different sentiments on each tag and some bakery twines! And here it goes:


I would like to share my Third Project with:

http://cuttlebugmania.blogspot.in/2016/05/embossing.htmlhttp://cardsundmore-challengeblog.blogspot.in/2016/05/challenge-159-lets-use-lots-of-colour.html


I hope you liked all the projects with these super cute monsters.

Happy crafting with this set J and lets say ZOOMMM! 

Love and Hugs


Ria

Monday, 23 May 2016

It's Summer Time

Hello crafty friends,

Hope you all are doing well. And I hope you liked my last post :)

Today I am playing along Paru's card making challenges , and I am quite late for the participation.

Last March,I had won in the Fab n Funky challenges and won some digi stamps from The Paper shelter. I didn't know what to do with these stamps, but now I have got one project to do with it. In the whole lot of won stamps, I got one image of yummy ice cream and I thought what could be better than to use it for Summer theme for the challenge!

Moving to the project and its process, I printed the digi stamp on a paper, and colored it in all the possible way I could and fussy cut it. I made the background with a stencil and overlayed some stamped decorative tape pieces from Kaisercraft, trying to stick to the color of scorching summer (yellow, orange and red).

I added a quote myself with the hand lettering and some wired thread! And here it goes...


Another look of the same


I hope you liked it :)

I would to attach this with http://paruscardmakingchallenges.blogspot.in/2016/05/may-challenge.html
2. http://countryviewchallenges.blogspot.in/2016/05/may-challenge-blog-hop-use-stencil.html
3. http://peek-a-boodesigns.blogspot.in/2016/05/challenge-6-inspire-yourself.html
Ispired from Vijaylaxmi Siyal's project, elements used: Stamping, fussy cutting, coloring, birthday celebration and distress inking :)


Thanks for stopping by :)

Love
Ria

Wednesday, 18 May 2016

Guest Designer at Peek-A-Boo designs India

Hello Crafty People,

Today, I have got the opportunity to design for Peek-a-Boo designs for this month.

Today I am going to show some of the projects that I did with the set that I received as my happy mail from Peek A Boo. The set- Flower in a Jar, is one such stamp set I have come across that has endless possibility to work with. Looking at the set only, gives you so many ideas. With this one set, you can assemble all the elements and even the smallest cute bee in one card but also you can use each and every element separately; I have tried to do the latter.

FIRST PROJECT:


For the first card that I have incorporated some painting skills of mine *grin* as the set gave me a beautiful picture to frame. I started with the Jar (the most beautiful element of the set). I stamped the Jar on a Water color Paper with two colors of distress inks viz. Gathered twigs from Tim Holtz distress inks and Green Garland from Artistry inks. First I stamped the Green on the stems and then the Brown on the rims of the jar to avoid merging these.


I loved the crisp image of the Jar and the stems. Then I took some water and a brush to wash the edges (but not too much) also by adding Broken china distress ink (to give a glass effect). I shaded the portion below the Jar with the same inks but this time the brown color on a greater proportion to get the dark shade.
Then I stamped all the flowers with Festive Berries Distress inks (to get the blotted effect) and shaded twice with the same ink to get some layers and finished it off with Gathered Twigs color for the last dark layer. For the leaves Green Garland again with the same technique as I did with flowers. Fussy cut all the flowers and the leaves and arranged it on the Jar simply by sticking it with glue.
I made some extensions to the bunch with the same used colors before to complete the picture. Lastly, the sentiment with some Archival Ink Black. And it’s done!!!!
With only Five colors the whole picture is complete :)


SECOND PROJECT:

For the second project I chose for a Tag. I took a cardstock, stamped the sentiment with Versamark and embossed it Black. I used a stencil and blended some Green Garland on it and again I stamped the Messy lines by Peek-a-Boo designs on it with the same color. I stamped the bunch of flowers separately and embossed it white. 


After that, I colored it with Peacock Feathers and Shaded Liliac distress inks and finished it with some sketching with dark blue, fussy cut them, and pasted it on the tags. And here it goes…


THIRD PROJECT:


My third project is again a card and again florals, as there are so many varieties of flowers to stamp, can’t get enough of one! I randomly stamped the roses with the leaves on a card stock. I colored it with Festive berries and Picked Raspberries, leaves with Mustard seed and Green Garland distress inks, and finished it off with some sketch pens (as they add the darkest shade I need all the times). The sentiment is embossed with white and here it looks like this…


FOURTH PROJECT:


My last project is with the tiniest stamp of the set, yes the BEE. The bee is too cute to ignore and I decided to make a whole card with the bee. I stamped, fussy cut, colored and pasted on a brown card stock. Made the edges on green with one of the designs from Its Plaid time by Peek-a-Boo. Some Mulberry flowers and a ribbon complete the Card.


 Stamps used:


I hope you liked all my projects. Pardon me for making the post long :P

Happy Crafting and enjoy all the Peek-a-Boo stamps!


Hugs

Tuesday, 17 May 2016

A birthday card using stencils

Hi all,

Today I did a quick birthday card for a colleague on her birthday. So, without wasting much time, lets Quickly into the process.

This time I am using stencil for the first time that i bought from C 4 craft based in Kolkata, India. I blended some Mustard seed distress ink with a blender through the stencil.

I added some Picked raspberry to the same to give a nice blend. I added a Heart cut sticker to the card and stamped BO-Bunny flutter stamp and colored it, fussy cut and stuck it with glue.

In the bottom I stamped a floral design from Stampendous designs randomly with Gathered twigs distress ink. Embossed the sentiment by combining words from Heidi Swapp. Ended the project with some Bakery twine from Lawn Fawn :)

and here it how it looks...

I hope you like it. Thanks for stopping by and leaving some love :)

Love 
Ria